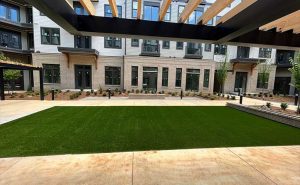
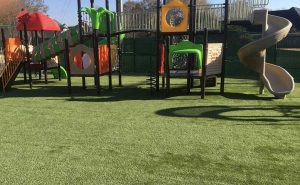
Artificial turf looks easy once it’s down, but the installation is where most of the “good or bad” gets decided. A smooth lawn comes from a few basic steps done in the right order: measure, prep the ground, build a firm base, then fit and secure the turf. Skip the prep, and you may end up with bumps, loose edges, or water that sits after rain. Do the prep well, and the turf can feel steady, drain the way it should, and look even from every angle. This guide breaks the process into simple, real-life steps you can follow. If you’d rather avoid digging and hauling, Lazy Grass provides artificial turf installation and can do it for you with confidence.
Plan The Layout Before You Buy Materials
Before you order anything, plan your layout like you’re laying flooring. Turf blades lean in one direction (the “grain”). If two pieces face different directions, you can notice a shade change, especially in bright sun. A quick sketch helps you choose where seams should land so they’re not the first thing you see when you step outside.
Simple planning steps
- Draw the area and break odd shapes into rectangles and triangles.
- Keep the grain running the same way across the whole yard.
- Put seams in quieter spots, not right in the middle of a walkway.
- Add about 5–10% extra turf for trimming and small mistakes.
Technical note: Most turf rolls are 12–15 feet wide. If your space is wider than the roll, you will have at least one seam, so plan that seam on purpose.
Clear And Grade The Area For Drainage
The turf needs a slight slope so water keeps moving. Start by removing sod, weeds, roots, and soft soil until you hit firm ground. You want enough depth for a compacted base plus the turf. While you dig, watch for low spots where water already sits after rain. Those spots will still be low later unless you fix them now.
A good target slope
- About 1/4 inch drop per foot, sloping away from the house.
- If you have a drain, slope toward it so water has a clear exit.
Easy way to check grade: set a long, straight board on the ground and place a small level on top. Lift one end until the bubble centers, then measure the gap under the raised end. Do a quick hose test once you rough-grade—if water runs where you want, you’re on track.
Build A Solid Base That Stays Level
The base is what keeps turf from feeling soft and what helps it stay flat over time. Most installs use a crushed rock base (often called road base or decomposed granite). The key is layering and compaction. Spread the base in thin lifts—about 2 inches at a time—then compact each lift before adding more. If you dump it all at once, the top may look smooth, but the lower layer can stay loose.
Base depth guide (typical yards)
- Light use: 2–3 inches compacted
- Regular family use: 3–4 inches compacted
- High traffic or pets: 4 inches or more if the soil is soft
Technical note: A plate compactor works best with multiple passes. Aim for 3–4 slow passes in different directions per lift. Lightly misting the base can help the fines lock in, but don’t soak it. When you’re done, your footprint should barely show.
Add Edging And Fabric To Block Weeds
If turf edges are not held tight, they can lift or creep over time. Edging gives the turf something solid to push against and helps keep the base from spreading. You can use composite bender board, metal edging, treated wood, or a concrete curb. What matters most is that it’s secure and set to the right height.
After edging, lay landscape fabric over the compacted base. This helps block weeds from below and keeps the base from mixing into the soil. Overlap fabric seams a few inches and pin them down so the fabric stays flat.
Small details that save headaches
- Keep fabric smooth—wrinkles can show through the turf.
- Leave access points for sprinkler heads, drains, and cleanouts.
- If you’re bordering mulch or rock, use an edge that holds materials back.
Technical note: Use rust-resistant staples or nails on the perimeter. Cheap fasteners can corrode and loosen in wet soil.
Cut And Seam The Turf So It Looks Seamless
This is the part where patience pays off. Let the turf relax in the sun for 30–60 minutes, so it uncurls. Place it with the grain direction already planned. When you cut, flip the turf and cut from the backing side, slicing between the stitch rows so you don’t cut blade rows by mistake. Use a fresh blade—dull blades tug and leave rough edges.
Seaming basics
- Keep edges close, but don’t overlap them.
- Use seaming tape made for turf and an outdoor turf adhesive.
- Brush blades away from the seam before pressing it down.
Technical note: Most turf adhesives need time to set. Weight the seam while it cures and avoid hard traffic until it’s firm. Seams hide better when the viewer is looking “with” the grain, not against it.
Secure Edges, Then Brush In The Infill
Once the turf is positioned, secure the perimeter first. Use galvanized nails or landscape staples every 4–6 inches along edges, and closer on curves. For large areas, add a few fasteners where needed, especially near seams, corners, and tight cuts. You’re not trying to cover the yard with nails; you’re trying to stop movement.
Now add infill. Many home installs use clean, dry silica sand. It adds weight, helps blades stand up, and supports the backing. Spread it in light passes with a drop spreader, then brush it in with a stiff broom or power brush.
A practical infill range
- Many turfs take about 1–2 pounds of sand per square foot.
- Add it in 2–3 rounds so it settles evenly.
Technical note: brush in different directions to lift the pile and help the sand drop down. If you can still see backing after brushing, you may need another light pass.
Final Checks, Care Tips, And Next Steps
Before you call it done, look at the yard from the spots you use most—patio doors, windows, driveway, or pool deck. Check that edges are tight, seams are flat, and the turf feels even underfoot. Then run a hose across the surface for a few minutes and watch where the water goes. It should flow off the surface and drain through the backing.
Quick final checklist
- Edges fastened and trimmed clean
- Seems tight and not opening up
- Drainage test looks good
- Blades standing up after brushing
For basic care, leaf-blow debris off, rinse dust now and then, and brush high-traffic spots when the blades start to lean. If you have pets, pick up waste fast, rinse the spot, and use a turf-safe cleaner when smells hang around. Also, take a look at edges every few months—if a corner starts to lift, a couple of extra staples can stop a bigger issue.
Conclusion: Simple Steps That Help Turf Last
A good turf install is mostly about prep and patience. Measure carefully, build a firm base, and keep your seams and edges tight. Once the turf is brushed and filled, it should feel steady under your feet and drain well after a hose test. If you want the job done by a local crew that handles base work, seams, and infill the right way, call Lazy Grass. Lazy Grass provides artificial turf installation for homes and businesses. Contact Lazy Grass today to schedule a site visit and get a clear, direct quote.